Monday, February 11, 2019

Personalized Children's Bags

Greetings fellow crafters! This week I received an order for a personalized toddler's book bag for a birthday gift. I was thrilled with how it turned out and it was super easy and fun to do!


The supply list is short and inexpensive:
  1. 13.5 X 13.5 Tote (Hobby Lobby)
  2. Siser easy weed Heat Transfer Vinyl (Micheal's)
  3. Iron or Easy Press
I designed the font and pictures in Cricut Design Space, they have a lot of really cute book, crayons, and other kid images to choose from. My co-worker loved it and actually gave me $20 for it when it only cost about $4 dollars to make. I have been having a difficult time calculating that to charge people for my crafts but a friend of mine mentioned there is an app called crafting price calculator that allows you to enter in cost of material, labor, and retail markup to see what you should charge. My next step is to open up my etsy shop and gather my different crafts I want to start selling. I have been super overwhelmed about opening the shop since it is very intimidating and I see shops out there that have had thousands and thousands of sales. I strive to be just as successful in my shop and am hoping to use some internet marketing tools I am learning while in the MBA program to assist in this life changing leap to selling! 


Thursday, January 24, 2019

Floral Shadow Box Gift

Hello there crafters! I was looking for a project to blog about for this week when I remembered by best friend's daughters first birthday is coming up. Perfect chance to put my new paper flower making skills to use! I decided to make her a personalized floral shadow box for her nursery. There are many variations of these types of boxes, I have even seen ones for new babies with their names and baby stats. Depending on how you want your flowers to look here are a few templates you can look at:

#D Floral Patterns
3D Floral Patterns: Cricut Design Space
The supply list is simple:
  1. 9X9 Shadow Box (I got mine from Michaels on sale)
  2. 25 sheets of light cardstock (3 different colors for my project)
  3. 1 sheet of patterned cardstock
  4. hot glue
  5. vinyl

Start cutting your 3D floral patterns out and roll, roll, roll! This project takes 25 rolled flowers which takes about 2 hours or so. One of my biggest struggles is choosing colors that mesh well, for this box I chose a coral, purple, and mint green. My friend is obsessed with mint green and was hoping the other colors would go nicely with it. 

I chose a fading purple almost water-colored card stock for the back which really made the colors pop. Once all the flowers are rolled you can hot glue them onto the card stock and backing of the shadow box. 

Last step is designing the vinyl for the front. White is the best color in my opinion because it is easy to see above the flowers. I designed my friends daughters name with a rose that I will attach to the front and walla!


These boxes are perfect gifts and my plan is to create a few more and post them on my etsy shop. They are a little time consuming but so simple and fun! Happy crafting!

Friday, January 18, 2019

Valentines Day Shadow Box


Floral Shadow Box
Floral Shadow Box
January is technically the crafting month for preparing for Valentine's Day. I decided to try rolled paper flowers, something that has always overwhelmed me in the past. They were actually very simple and a lot of fun! Check out the supply list:

  1. Shadow Box (Michael's... wait for a sale)
  2. cardstock paper
  3. vinyl
  4. hot glue gun
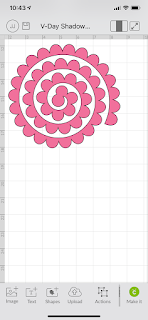
That is it, I swear! You can find the template for the paper flower in the cricut design space or good 3D flower templates and import the images into design space but they should look something like this...


I also found this helpful guide to see what templates make which flowers.

Photo Credit: fabcraftsandmore.com


I used a paper quilling tool to roll the flowers but you really can use anything you have around the house. Once you roll the flower you hot glue it to keep it in floral form. To make the background of the box I use two different colored card stocks and cut a heart shape out which I used for the outline to place the paper flowers. 

Once you make all the flowers you can hot glue them in place. The last step is to cut and attached the vinyl to the glass and project complete! Perfect Valentine's day gifts! Happy crafting!

Sunday, January 13, 2019

Christmas Gift Pot Holders and Dish Towels

This holiday season was extremely busy for my family this year. We took a trip to visit my dad in Michigan and I was hosting Christmas, along with trying to shop for gifts and maintain my sanity. This year I decided to save a few bucks by making gifts for my co-workers instead of purchasing everyone a store bought item. I have about 10 co-workers to give gifts to so I needed to find something that did not cost an arm and a leg. I checked Etsy and found SVG files for these cute potholders.

test
Add caption

The materials needed to the potholder project are as follows:
  • Red Potholders (Dollar Store $1 each)
  • Whisk or spatula (Dollar Store $1 each)
  • Cookie mix (Dollar Store $1 each)
  • Cellophane wrap (Dollar Store $1 per roll)
  • Ribbon
  • Heat Transfer Vinyl
  • Iron or easy press 

After I purchased the SVGs I uploaded them into my cricut design space (for those of you who do not have a cricut go to a craft store and buy one ASAP). Then I cut the images onto HTV....


You then use an iron or an easy press to attach it to the potholder. This was such an easy and cheap project I decided to not only gift these to all my coworkers but also decided to make dish towels and gift them to all the women in my family. 


Here is the final gift ready product.

Literally, the entire office was shocked that these were home made and loved them! The dish towels were also super easy and I was able to buy the towels in bulk on Amazon for super cheap! 


The towels turned out amazing and I tied them together with a burlap string and wrapped them in cellophane just as I did the potholders. Overall, the cost breakdown for each item was only $3 but they looked much more expensive and personalized. Be sure to keep a lookout for next week's blog as we start making Valentine's Day decor for your home or as gifts!