Monday, February 11, 2019

Personalized Children's Bags

Greetings fellow crafters! This week I received an order for a personalized toddler's book bag for a birthday gift. I was thrilled with how it turned out and it was super easy and fun to do!


The supply list is short and inexpensive:
  1. 13.5 X 13.5 Tote (Hobby Lobby)
  2. Siser easy weed Heat Transfer Vinyl (Micheal's)
  3. Iron or Easy Press
I designed the font and pictures in Cricut Design Space, they have a lot of really cute book, crayons, and other kid images to choose from. My co-worker loved it and actually gave me $20 for it when it only cost about $4 dollars to make. I have been having a difficult time calculating that to charge people for my crafts but a friend of mine mentioned there is an app called crafting price calculator that allows you to enter in cost of material, labor, and retail markup to see what you should charge. My next step is to open up my etsy shop and gather my different crafts I want to start selling. I have been super overwhelmed about opening the shop since it is very intimidating and I see shops out there that have had thousands and thousands of sales. I strive to be just as successful in my shop and am hoping to use some internet marketing tools I am learning while in the MBA program to assist in this life changing leap to selling! 


Thursday, January 24, 2019

Floral Shadow Box Gift

Hello there crafters! I was looking for a project to blog about for this week when I remembered by best friend's daughters first birthday is coming up. Perfect chance to put my new paper flower making skills to use! I decided to make her a personalized floral shadow box for her nursery. There are many variations of these types of boxes, I have even seen ones for new babies with their names and baby stats. Depending on how you want your flowers to look here are a few templates you can look at:

#D Floral Patterns
3D Floral Patterns: Cricut Design Space
The supply list is simple:
  1. 9X9 Shadow Box (I got mine from Michaels on sale)
  2. 25 sheets of light cardstock (3 different colors for my project)
  3. 1 sheet of patterned cardstock
  4. hot glue
  5. vinyl

Start cutting your 3D floral patterns out and roll, roll, roll! This project takes 25 rolled flowers which takes about 2 hours or so. One of my biggest struggles is choosing colors that mesh well, for this box I chose a coral, purple, and mint green. My friend is obsessed with mint green and was hoping the other colors would go nicely with it. 

I chose a fading purple almost water-colored card stock for the back which really made the colors pop. Once all the flowers are rolled you can hot glue them onto the card stock and backing of the shadow box. 

Last step is designing the vinyl for the front. White is the best color in my opinion because it is easy to see above the flowers. I designed my friends daughters name with a rose that I will attach to the front and walla!


These boxes are perfect gifts and my plan is to create a few more and post them on my etsy shop. They are a little time consuming but so simple and fun! Happy crafting!

Friday, January 18, 2019

Valentines Day Shadow Box


Floral Shadow Box
Floral Shadow Box
January is technically the crafting month for preparing for Valentine's Day. I decided to try rolled paper flowers, something that has always overwhelmed me in the past. They were actually very simple and a lot of fun! Check out the supply list:

  1. Shadow Box (Michael's... wait for a sale)
  2. cardstock paper
  3. vinyl
  4. hot glue gun
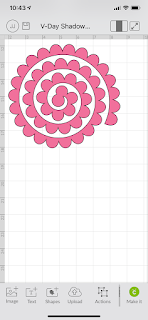
That is it, I swear! You can find the template for the paper flower in the cricut design space or good 3D flower templates and import the images into design space but they should look something like this...


I also found this helpful guide to see what templates make which flowers.

Photo Credit: fabcraftsandmore.com


I used a paper quilling tool to roll the flowers but you really can use anything you have around the house. Once you roll the flower you hot glue it to keep it in floral form. To make the background of the box I use two different colored card stocks and cut a heart shape out which I used for the outline to place the paper flowers. 

Once you make all the flowers you can hot glue them in place. The last step is to cut and attached the vinyl to the glass and project complete! Perfect Valentine's day gifts! Happy crafting!

Sunday, January 13, 2019

Christmas Gift Pot Holders and Dish Towels

This holiday season was extremely busy for my family this year. We took a trip to visit my dad in Michigan and I was hosting Christmas, along with trying to shop for gifts and maintain my sanity. This year I decided to save a few bucks by making gifts for my co-workers instead of purchasing everyone a store bought item. I have about 10 co-workers to give gifts to so I needed to find something that did not cost an arm and a leg. I checked Etsy and found SVG files for these cute potholders.

test
Add caption

The materials needed to the potholder project are as follows:
  • Red Potholders (Dollar Store $1 each)
  • Whisk or spatula (Dollar Store $1 each)
  • Cookie mix (Dollar Store $1 each)
  • Cellophane wrap (Dollar Store $1 per roll)
  • Ribbon
  • Heat Transfer Vinyl
  • Iron or easy press 

After I purchased the SVGs I uploaded them into my cricut design space (for those of you who do not have a cricut go to a craft store and buy one ASAP). Then I cut the images onto HTV....


You then use an iron or an easy press to attach it to the potholder. This was such an easy and cheap project I decided to not only gift these to all my coworkers but also decided to make dish towels and gift them to all the women in my family. 


Here is the final gift ready product.

Literally, the entire office was shocked that these were home made and loved them! The dish towels were also super easy and I was able to buy the towels in bulk on Amazon for super cheap! 


The towels turned out amazing and I tied them together with a burlap string and wrapped them in cellophane just as I did the potholders. Overall, the cost breakdown for each item was only $3 but they looked much more expensive and personalized. Be sure to keep a lookout for next week's blog as we start making Valentine's Day decor for your home or as gifts!

Wednesday, November 28, 2018

Reverse Canvas


The reverse canvas project is the newest crafter craze right now and the perfect topic for this weeks blog. This was my very first try and it was much easier than I thought it was going to be and I actually had all the supplies on hand. For this you need...
  1. Plain canvas (any size you like)
  2. Box cutter or exact o knife 
  3. Paint or wood stain
  4. Brush
  5. Heat Transfer Vinyl
  6. Iron or Easy Press
  7. Hot Glue Gun

Your first step is going to separate the canvas from the wood. You could do this in a few different ways but after watching a million youtube videos it seemed like the box cutter option would be the easiest instead of removing the back staples. 


Next you paint or stain the wood. If you are looking for a more fun and colorful design I would opt for paint but if you are doing a decorative or gift the stained frames look really sharp. I chose paint which started with a purple base coat then I splatters a blue on top. While the paint drys you can design and cut your HTV but in my case I cheated a bit and used a pre-designed HTV that was included in my new easy press that reads, "makers gonna make". Quick tip is to measure the inside of the wood for your design and not the entire white canvas because you will be using about 1 inch on every side for the final re-attaching step. 


Now you can warm up your easy press or iron and attach your image to the canvas. Check your heat settings because the easy press recommended 340 degrees for 50 seconds with heavy pressure and removing plastic once cooled.  


Once it is cooled you can grab your hot glue gun and attach your canvas to the back of the wood. Make sure to do a little at a time in different areas first while pulling it snug each time you apply the glue. Super simple, fun craft to do, it makes great gifts or home decor! Thanks for reading and happy crafting! 

Tuesday, November 20, 2018

Heat Transfer Vinyl T-Shirts

Hi Friends!
I decided to dive into the world of heat transfer vinyl also known as HTV. You have make custom shirts, purses, pot holders, bags and so much more. Since I am a newbie I decided to start small and easy with t-shirts for my two year old twins. If you catch a good sale at a craft store like Michael's, Joanns, or Hobby Lobby you can score some pretty good prices on HTV. I picked up white and gold glitter for this project. I ended up getting two black shirts at Target but there is a great website called jiffyshirts.com. If you are looking to buy in bulk this will be your best bet. I also invested in the Cricut Easy Press which is essential an iron but way cooler. You can set specific temperatures and timers for your projects.
 

I purchased the "#Twinning" design on Etsy and used the "I love glitter" font for the girls names which i downloaded from "dafont". After you cut your design out on the HTV you weed out the access material and set up your shirt. 

There is a cheat sheet for the easy press that says how long and at what temperature to use for the materials you chose so since I have a plain white and a glitter I did it in two steps.


This was literally one of the easiest craft projects I have ever done! I have only scratched the surface of HTV but plan on doing many more projects! Happy crafting! 

Friday, November 16, 2018

Hot Mess Canvas Part 2

I know everyone has been on the edge of their seats for the conclusion of the Hot Mess Canvas crafting project. We left off waiting patiently for the mod podge layer to dry over our vinyl image. A quick tip is to blow dry between layers, this not only speeds up the process but helps the vinyl stick better. The next step...

There are two ways you can do the next step in this project. The first way is to brush paint over the entire canvas, doing this will result in multiple layers to really cover it. The second way is to get some spray paint and spray away. Few things to remember... spray paint outside in a well ventilated area, you make think that your indoor craft room will work for this step but I assure you it will not. Please go outside, as I nearly passed out from trying this step indoors and caused a rather, heated argument with my spouse.
 

If you go the paint route you can blow dry after each coat of paint and then start peeling the vinyl rather quickly but if you spray paint you should let it dry overnight. Once it is dry you can peel off the vinyl and it reveals the underlining paint. You can choose any color for the background. For this project I chose black. 


The below is the first one I did using the brush paint method. 

For this one I chose white paint but as you can sort of tell, even after 5 coats you can still see through it a bit. Luckily, this is called a hot mess canvas for a reason and you really can have fun with it and save your perfectionism stresses for another project. Thanks for reading and happy crafting!

Tuesday, November 6, 2018

Hot Mess Canvas Part 1

If any of you are like me, my painting art skills are seriously lacking. I could paint a cow and people would probably think it was a rabbit. If you are looking for a crafty painting project that requires no art skills whatsoever, the HOT MESS canvas is just for you! First step is to visit your local craft store and purchase a white canvas, at least 4 different acrylic paint colors of your choice, a brush, mod podge, a roll of vinly, contact paper, and a cricut machine. Next step is to cover the entire canvas in all the paint colors like a crazy person...


I know this may seem crazy... but trust me the messier the better. Now you need to design an image or words on your cricut design space and cut out your vinyl. 

In case you do not have a cricut machine you can instead... wait.... no no no, you need a cricut machine in your life, so if you do not have one go buy one immediately. Once your machine finishes the cut of your vinyl you then transfer it to your contact paper and attach it to your painted canvas. 

The white coat you see over the image is Mod Podge, this is a clear drying glue like material that helps the final coat of paint over the top stop from bleeding into the image outlines. 

Mod Podge is used for just about every craft project ever. You can use a hair dryer so speed up the drying process. Check back for Hot Mess Canvas Part 2 to see the rest of the steps in this project.

Tuesday, October 30, 2018

DIY Tutu

Halloween is upon us and one of my favorite holidays. My girl's are dressing up as Dorothy and the Wicked Witch from the Wizard of Oz. I plan to portray the Wicked Witch as not so wicked for my two year old, Charlotte and for that we need a TUTU! Since the Witch is primarily green and black I chose black and green glitter tool from Hobby Lobby. Make sure you don't try to craft on Sundays because they are closed.


The easiest way to start is by measuring your kiddos waist and subtract 4 inches to cut the elastic. You can then hot glue the elastic together for the "no-sew" option. Then you measure the length you want the tutu to be and cut a piece of cardboard this length. Next, you wrap the tool around the cardboard and cut where you started to make your strips but the main point is that the strips need to be twice as long as you need the tutu to be in length.

Next, you can layer two or three pieces and tie a knot around the elastic. 

Perfect for the Wicked Witch!

Saturday, October 27, 2018

Sesame Street Cupcake Making

These Sesame Street themed birthday party is giving this mamma a run for her crafting! My next ambitious ordeal is making the famous Elmo, Cookie Monster, Big Bird, and Oscar the Grouch in delicious cupcake form. For this project I needed two boxes and cake mix, ingredients for the cake mix, a ginormous container of ready made frosting, frosting coloring gels, pastry bags and tips, and ingredients for the faces of the characters.


First came Elmo, the most famous of all that my kiddos are obsessed with. He consisted of lemon cake, red furry monster frosting, an oreo cookie mouth, M&M nose, and two candy eyeballs. He was delicious!


Big Bird was used with a petal frosting tip to look like a big old yellow bird, and his beak was candy corn (thank goodness for Halloween candy) and more candy eyeballs. 


Oscar, the Grouchy little fellow was messy green frosting, devils food cake, an Oreo cookie mouth (sticking out his tongue) candy eyes with his famous brown bushy eyebrows. 


  By the time I got to Cookie Monster I was fresh out of eyeballs and thanks to Halloween season, every grocery store in a 10 mile radius was also out of them. After an epic meltdown and a run to McDonald's drive thru, I ran over to Michael's Craft store and luckily they had one box left! This blue cookie fiend was devils food chocolate cake, blue furry monster frosting, chips ahoy cookie, and those hard to find candy eyeballs. These were a big hit at the party! Check back to see how I crafted some decorations for the party.

Sesame Street Cookie Making

The month of October is a special month for my family, it is my twin girls Birthday month! This year they turn two and since they are living, dreaming, and breathing Sesame Street what better theme for their party could there be? As usual, I am too excited, ambitious, and creative so I decide to make homemade Sesame Street cookies. I ordered the cookies cutters on Etsy  and after a semi-successful trial run in September, I am ready for the real thing. I take two days off work and run to every craft store in town to get frosting coloring, pastry bags, and everything and anything needed for cookie making. So then I begin by making the dough and cutting the cookies.


There is Elmo, Cookie Monster, Street signs, and number 2’s. Next step is making the royal icing frosting to use the technique called Cookie flooding. Starting with the outlines first then filling in with color.


Eight long hours later, filled with blood, sweat, and tears, we have awesome Sesame Street cookies ready for my two year old twin girls birthday! Stay tuned for the cupcake blog...